starburst blanket

While the political world is burning, I need to do some non-political stuff, lest I rage-stroke out while calling every goddamn one of the congresspeople--and I mean every. damn. one.

finished blanket!

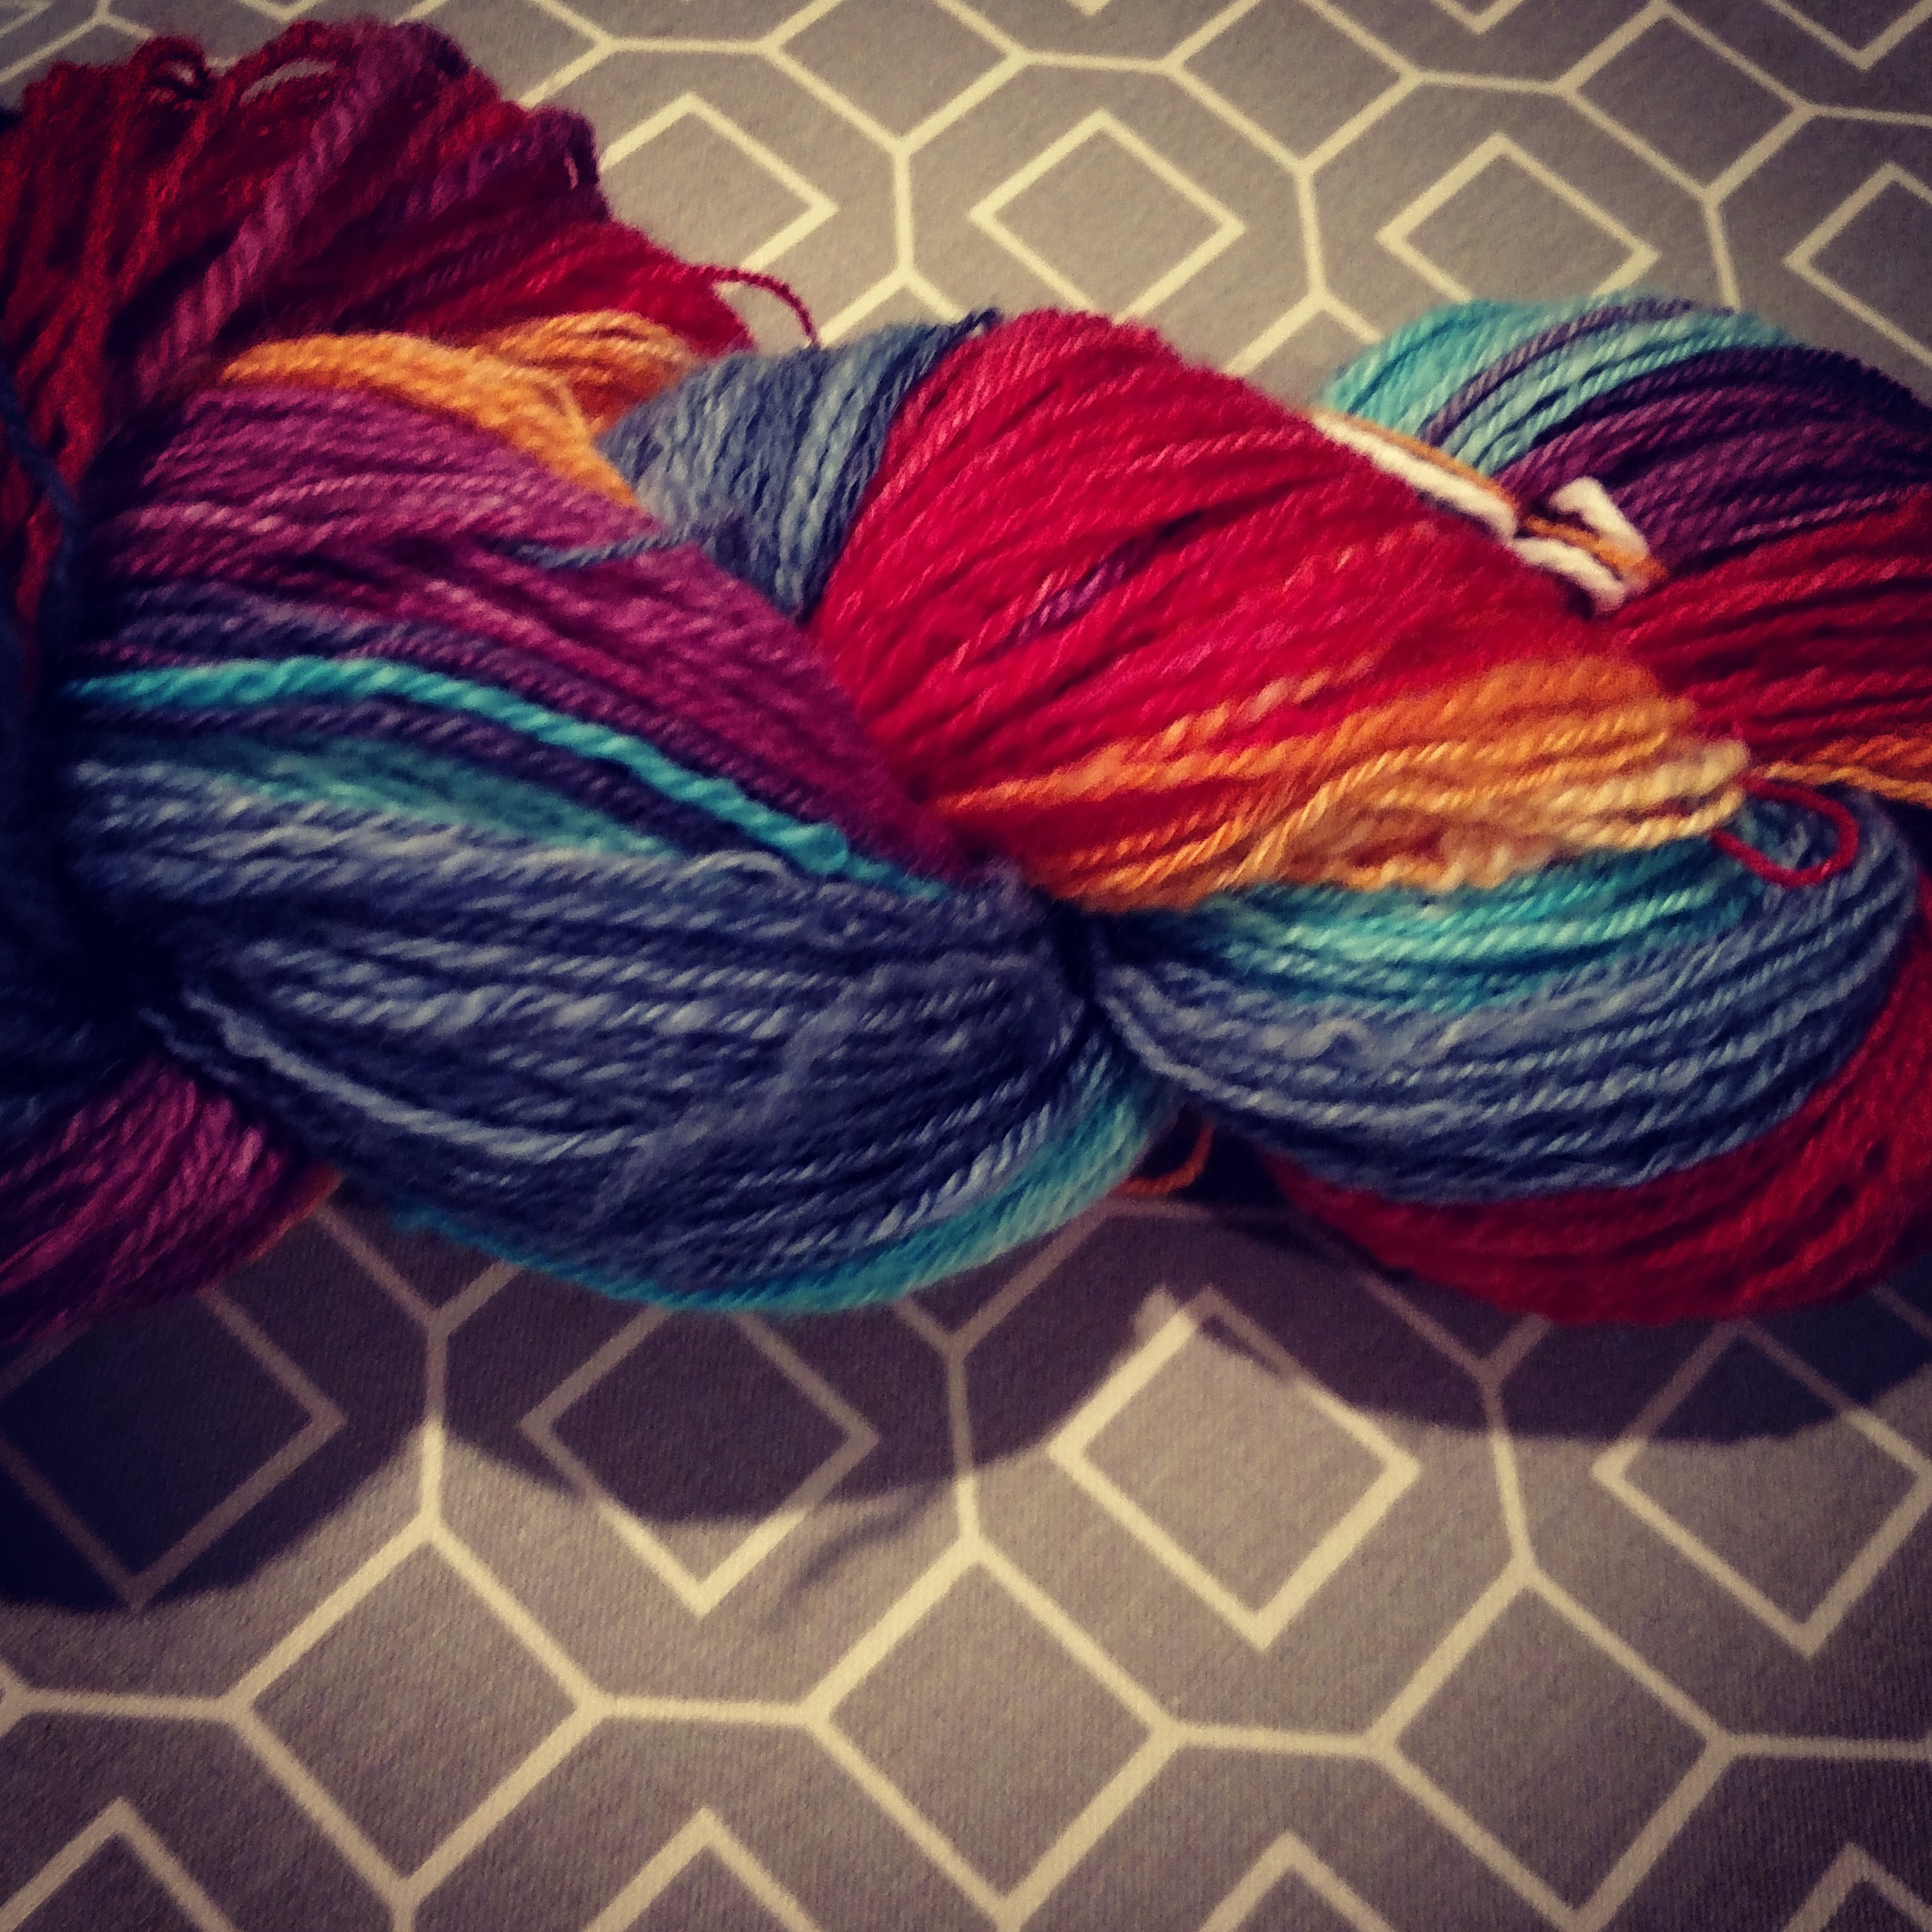
And so, I present the granny square blanket.  I'm not normally a big crocheter, but after a holiday season where I crocheted three mermaid blankets and one shark blanket for various children (it's way faster than knitting, and I needed to knock those babies out), I was left with a bunch of leftover yarn.  Combine that with the need for distraction, and the fact that the crochet hook was downstairs and my knitting needles were upstairs . . . Voila! A granny square starburst blanket was born.

The white, aqua, and grass green were left over from the littlest little's mermaid blanket, the dark blue and mint green were left over from my niece's mermaid blanket, and the grey was left over from the biggest little's shark blanket. 

Of course, because I didn't have enough of several colors, it also required me heading back to the store no less than three times.  Planning ahead! One day I will do so.

stacks of squares

I'd originally thought the blanket would be all the blue squares, but after finishing 24 squares, I realized that not only was I was out of the aqua, so were the stores.  Luckily, I had the grass green, and so switched to that for another 24 squares. 

The pattern is a pretty straightforward starburst granny square.

I used a magic loop beginning, chained 3 into that for the first double crochet, then double crocheted 11 into the chain (for a total of 12 dcs), slip stitch to attach and finished off, pulling the magic loop tight. 

center circle, 12 dc into a circle

beginning round 2, clusters of 2 dcs

Second round was the mint green.

In one of the spaces between the double crochets of the white round, I chained 3 for the first dc, then another dc into the same space, then 2 dc into each space around (a total of 24 dcs), slip stitch to attach, and cut yarn.  

final round 2

Third round, dark blue.  

Chain 3 for the first dc into one of the spaces between the 2dc clusters of the round before, then 2 more dc into the same space, then 3 dc into each space between the clusters of the previous round. Slip stitch to attach, cut yarn.

round 3 in progress, clusters of 3 dcs

round 3, finished

Fourth round, either aqua or grass green.  Now you make the rounds into squares:,

round 4.  Corners!

  • ch 3 into a space between the clusters, then 2 dc into the same space
  • 3 dc into the next space to make a regular cluster 
  • 2 dc, chain 2, 2 dc into the next (3rd) space to make a corner 
  • 3 dc into the next (4th) space; 3 dc into the next (5th space) 
  • Another corner into the next space (6th) 
  • Regular clusters into each of the next 2 spaces (7th and 8th spaces) 
  • Another corner (9th space) 
  • 2 more regular clusters (10th and 11th spaces) 
  • Last corner (12th), slip stitch to your beginning and fasten off

round 4, finished.  Note wonky square.  

The last round of clusters is grey, and it helps square off your somewhat wombly square by using half double crochet clusters on the sides, and double crochet for the corners. 

round 5, even out the wonkiness of the square with hdc and dcs.

  • ch 2, 2hdc  into first space; 3 hdc into each of the next 2 spaces (this is one flat side)
  • 2 dc, ch 2, 2 dc into the corner space
  • 3 hdc into each of the next 3 spaces
  • another dc corner
  • another hdc side
  • another dc corner
  • last hdc side
  • last dc corner
  • slip stitch and then...

round 6, the sc round

At this point, I could have done another round around of dc clusters, but I worried that would be too much grey, so I ch 1. I decided to single crochet around each square (using 3 sc into each corner space to turn the corners), slip stitched to join and fastened off. 

finished square, not blocked

I wove in the ends as I went, because I hate nothing more that 1) weaving in ends in crochet and 2) doing it all at the end.  By weaving them in as I made the squares, I was able to secure them a bit by also working the next round over the ends as well as weaving them into the work.  I've had a granny square blanket come apart because ends worked themselves out and never again. 

For ease of use and maximum mindless distraction, I did all the centers first, then all the first rounds, etc.  Except for when I ran out of aqua--I finished all the aqua ones with the grey, and took stock of where I was.

Layout is always tricky and where I am no good.  So I asked the internet whether they preferred rows/columns of the two color or alternating.  Unfortunately the internet was split, so I made my husband decide.  He went with columns.  Thus, columns.

alternating squares (also, clearly I was not yet done with the green ones)

columns

I joined the squares together by flat slip stitching through the back loop of the edging.  I held the squares to be joined together, wrong sides together, and then put the hook through the back half of each of their edge loops.  I'm not explaining it well, naturally. Luckily Craft Passion has a great tutorial.  

halfway joined.  the squares are all slip stitched together in vertical columns, and are halfway attached by rows (from the bottom up)

If I hadn't done the sc around the edge, I probably would have used dc clusters to join the squares, as that's my preferred look.  But I was running short on grey, and was not about to rip out that last line of sc around the squares at this point. 

Finally, I did a border around the whole thing of hdc, then a round of sc.  

And done!

Back to yelling as loud as I can, as often as I can, at my elected reps.


DIY wall hangings on a cardboard loom

Have you seen the anthropologie, boho style wall hangings popping up everywhere lately?  This fall I got really into weaving again because of them.  

I say again, because when I was in high school, I did some weaving, both on a tabletop cricket style loom (my color choices were... lacking on that one), and also a straightforward tapestry loom.  I still have the tapestry hanging in my office, and it's one of my favorite things I've made.

it's held up quite well since 1993, no?

Here's the thing:  weaving is not hard--over, under, over, under.  Making a loom from cardboard is not hard.  They are literally crafts for preschoolers.  But you can make some gorgeous stuff on them just with a few key choices on your part.

There are several gorgeous small maker tapestry loom artisans out there making some amazing tools that are totally worthwhile if weaving is going to be a major hobby for you (heeey there Hokett looms! I got three of you for Christmas and am LOVING THEM), but if you just want to try it on for size, and don't want to financially commit much scratch to the project, just scrounge around for some cardboard.  I'm sure you've got an amazon box floating around somewhere. The weaving I made it on waaaay back in the early 90s? Done on cardboard.  

Now, ovbs, that's not the same loom I made back in 93.  I keep stuff, but I'm not a hoarder.  This one is a new one I made to do a few wall hangings on.  It's a top flap of a box something or other came in, and perfect for a loom because it's relatively sturdy with no creases or bends, and not enormous.  This is a lap loom, so think about what will make an appropriate size for you.

I took a ruler and pencil, and marked a straight line across each short end, about an inch in from the edge.  Then I measured every 1/2" along that line, and drew a line for my notches.  Using scissors, I cut in along those notch lines from the edge to the marked line, and no further.  Do this on the top and bottom, and voila.  A loom has appeared!

As a reminder: warp threads are the threads that go up and down vertically on your loom.  You weave over and under, back and forth, with weft threads.  Warp threads are best to be relatively smooth and strong, as they are more under tension than weft.  You can use pretty much anything for weft.

a wall hanging done with a jute twine warp

For a tapestry or wall hanging loom, when I don't want the warp threads to show, I just use crochet cotton, the kind that comes in a ball with a cardboard core.  It's thin, so the weft threads can pack around it; it's strong, so I don't need to worry about breakage; it's smooth, so I don't need to worry about weft catching on it or it abrading away with all the over-under-ing going on; and it's cheap.  You can, of course, get actual rug warp thread, which is advisable if you're going to go hardcore on this, but I have yet to have a problem with crochet cotton.

I've also done several weavings where the warp was designed to show, and in this case, I used sisal twine.  Though a bit rough and not super flexible, it looks great and rustic, which is what I was going for.  Kind of a pain in the ass to warp the loom the first time, but I got used to it.


to begin to warp your loom, and secure the ends

To warp your loom, first secure the end of the warp thread to the back of the loom--see above.  Sometimes I use tape, sometimes I tie a double knot around the notch.  Tape's easier, but can work itself loose.

Once the end is secure, run the thread down through the notch to the front of the loom, and down to the corresponding notch on the lower edge of your cardboard.  Run the thread through the notch, and back around the next notch in line, making a little loop behind the notch, as you can see above.  Make sure you pull your warp snug, you want a bit of tension in the warp but not so much you bend the cardboard.   Run the thread up to the next open notch on the top edge, go around the back of the notch, and run the thread through down the front again.  Keep doing this for every notch, so the warp threads are all on the front of your loom, as seen here:

When you've filled your last notch, cut the warp thread from the spool, leaving a good 6" or so, and secure the end to the back--again, either with a knot or a piece of tape.  Voila, you've warped your loom!

Now, check out that image above again.  There's a narrow rectangle of cardboard down at the bottom.  That's from a cereal box, and I wove it over and under the warp threads to keep an even space at the bottom.  Later, when you're done with your weave, you'll need to finish it by tying off the warp threads and either making fringe or weaving the warp ends in the back of the piece.  You can skip this spacer if you're planning on using a dowel or stick at both the top and bottom of your weave.

over, under, over, under . . . note the rounded shape of the weft

Now you're ready to weave! Thread a tapestry needle, or other needle with a large eye, with your chosen weft yarn, and start going over and under your warp threads.  Leave a bit of a tail in the back of the piece to weave in later to secure the weft threads.  

Oh, and if you've done any weaving before I'm sure you've encountered the dreaded pulling in of the sides.  It happens to all of us the first few times and the key to avoiding it is to NOT PULL TIGHT.  In fact, bubble the weft thread at an angle as you go over and under, and don't yank on the weft.  Gently push the threads down with your fingers, a wide toothed hair comb, or even a fork (this is called beating down the weft).  The actual act of going over and under threads takes up some of the length of the yarn, and by bubbling or angling the weft up before you beat it against the previous rows, you're allowing the weft to take up that length, and settle nicely.

I highly recommend using a relatively plain worsted weight or thinner yarn for the first few rows of weft, and weaving a plain weave, or tabby weave, for several rows.  The plain weave is literally: over one thread, under the next.  On the next row, go under the threads you went over last time, and over the threads you went under before.  This will help give a nice selvedge edge to your hanging.

When you come to the end of your weft thread, pull it through to the back, leaving a few inches as a tail.  Then thread another piece--same color, different color, whatever you want!--and keep going.  Change colors, skip warp thread (over 2, under 2; over 2, under 1, etc.) to get the pattern you want.  Add fringe with rya knots, texture with soumak weave, weave straight lines, angles.  There are infinite possiblities! And try lots of things for your weft! I love working with roving and wool top (unspun fiber), jute twine, and metallic fibers, and I've seen amazing weaves made with birch bark and ribbons as well.  Mess around, see what you can come up with!

I am not the fringiest of ladies, but sometimes, it's called for.

work in progress, featuring rya knots, soumak, and roving. The big puffy white section is wool roving, the narrow line of white is a line of soumak weaving in a chunky yarn.  The rya knots make a fringe.

When you've reached the top of your cardboard loom, you're ready to finish your weave! You need to pop the weave off your loom, leaving the warp loops as is.  Since I tend to hang my weaves from a stick or a copper pipe, I use the warp loops at the top of the loom, and just slide a dowel or a stick into them.  The bottom loops I cut and tie together in pairs using a square knot.  If I've done fringe at the bottom, you can leave the warp ends as is.  If I've skipped fringe, I use a tapestry needled and weave the warp ends back up into the weaving on the back side. I also weave in the loose ends of the weft from color changes and yarn ends to secure them a bit, and trim close to the work.  Because the wall hangings don't actually take on a lot of stress or weight, the ends are not likely to work themselves loose.  

 The Weaving Loom has some fantastic weaving tutorials for things like rya knots and soumak weaves (wrapping around the warp threads for texture).  I highly recommend checking them out, as well as a number of other weaving tutorials on you tube. There's a wealth of information out there.

It's weird because after years of training myself not to work with yarn under tension, and to never tie knots, I'm now into two fiber crafts where it's ok to keep yarn under tension and ok to tie knots. 


Spinning my wheels

Not really wheels, actually, since I don't have a spinning wheel (YET--that's my big plan for Rhinebeck! I'm coming away from that weekend with a wheel, or espinner). But I am catching up on the list of projects I have in my head, somewhat killing time until I do get a wheel.  There are a few bumps and braids of fiber I'm dying to spin, but that I don't want to tackle on a spindle quite yet. So meanwhile, I'm filling in the gap with some other projects.

chain ply (3 ply) on the left, two ply on the right

Last year, after learning to spin, I joined the Spunky Eclectic fiber club, and so every month I get 8 oz of gorgeously dyed fiber, all different sorts (I signed up for the double option, thus the 8 oz).  I'm a few months behind on spinning some of the fiber, but I just finished up April's Cheviot Sheepswool in the colorway Golden Fields.

Since yellow is rarely my bag--love the color but I can't wear it well at all--I figured I'd experiment and practice with technique a bit here, and tried a semi-woolen spin on the spindle.

The first bump--shown on the right--I spun a two-ply, making faux rolags by tearing chunks off the bump, fluffing them, and rolling them into a little sausage and spinning from that.  I spun as the colors came and stopped and rolled off the cop into a ball about halfway through, spun the rest and then plyed together.  It's a bit barberpoley, and the singles were wildly uneven as I was getting used to the technique (and it was a put down-pick up kind of project), but I'm happy with how the final product turned out.

The second bump--shown on the left--I decided to pull apart and sort by colors and spin the single kinda as a gradient from yellow to white/grey to blues.  With this bit more of fiber prep, I took the opportunity to really pull the fiber bump apart to be more of a woolen prep approximation, and spun from color to color.  To keep the color progression I chain plyed (chained it as I wound it into a plying ball and then added twist--a lot of twist actually).  I beat the hell out of this one in the finishing, and I'm really pleased with how the twist settled and spread out through the yarn.  It's still a bit uneven in thickness, but eh, second time attempting something like a woolen yarn. 

Now I just need to figure out what to make with them.  That's a whole other ball of wax. 


look I made a hat!

Not a hat. Almost a muppet.

Not a hat. Almost a muppet.

Well, almost a hat.  And in fact, probably not going to wind up a hat, maybe socks? Or a shawl?  I don't know yet.

JBB suggested doing a stuffed muppety dinosaur with it, because muppet colors.  But I'm not sure a fingering weight handspun would work, plus I'm wary of how the gradient would work up on a figure.  I'll think about it anyway.

This is the December 14 Spunky Eclectic club fiber (4oz, BFL superwash), spun on a spindle and then chain plied on the same spindle to keep the color gradient. It goes from Big Bird to Zoe to Elmo to Tully to Rosita to Grover. 

I figured out chain plying! Which is apparently more advanced than I'd anticipated! But also pretty straightforward when you figure it out.  I pulled long loops of the single through loops, essentially making a big ole loose crochet chain, and wound that into a plying ball. then I added twist with the spindle from the plying ball.  If none of these words make sense to you, here's a tutorial on chain plying from Craftsy. It has pictures that might help. 

I was expecting this to come out more as a light worsted weight yarn, since this is a chain ply--so a three ply--but I guess my singles were way lighter than I'd realized.  Which actually makes me very glad that I did not do my original plan of spinning the other 4oz I have and making a 2-ply yarn.  

Speaking of that other 4oz . . . I am thinking that I'll split it in half, and try to spin that to about a worsted weight two-ply, then maybe make mitts or a hat? Suggestions anyone?