to zip or not to zip?

To zip or not to zip?  That is not really an option. Thing thing will have a zipper come hell or high water. The question is WHICH zipper? 

So remember that sweater I made the biggest little this winter? The warm and cozy wool hoodie that I didn't finish until April, when it turned warm?

Whelp, I finally got the zipper choices for it, from zippersource.  (I am the only reason it took forever to get them, their shipping and customer service was and is great! custom length! many colors! I am just a slacker when it comes to ordering)

dun da-da-dun, I'm Super Contrasty!

Too dull?

So which color do we like best? I purposefully chose a not-perfect-match for a bit of contrast, and I'm planning on facing the zip with  a ribbon more in the realm of the sweater than in the realm of the zip.

I'm torn: The red is a nice punch of contrasting color, but does it look too superhero? I like the slightly lighter blue, but is it too pale of a blue?

Should I--dare I say it--order a different color and put off the finishing of this sweater YET AGAIN?

I mean, who are we kidding, it's not like another week or two will really matter at this point. The kid isn't getting much wear out of it with this gross muggy humid weather.

Another little project

back in September, i bought a few skiens of Noro Silk Garden, theoretically to do mittens with.

Well, nearly seven months later, i finally started (and finished) them. 


matching not matching mittens

matching not matching mittens

These are two separate colorways of Noro, which has a built in long color change stripe. I knit two rows with each skein, carrying the unused yarn up as I went.

There are many mitten patterns around, and I generally use my fairly standard made up mittens recipe:

For heavy worsted, on size 5 double pointed needles, cast on 36 stitches, knit in 2x2 rub for a while. I like long cuffs, so i did a few stripe repeats here. 

Switch to knit, and knit about an inch or so. Then begin the thumb gusset by increasing one stitch on either side of the first stitch of the round every other round until you have 13 stitches for the thumb. (Here, I actually did a slower increase of every 4 rounds, which pushes the ribbing farther down the arm).

Put the thumb stitches on waste yarn, cast on one stitch over the gap and work until you're about half an inch from the tips of your fingers. Decrease at 6 points around (divide stitches evenly over three needles and put your decrease points at the middle and ends of each needle), every other row until half your stitches are gone. Then decrease every round until you're left with 6 stitches. Pull the yarn through the 6, and fasten off.

Finish your thumb. Put the held stitches on the dpns, and join yarn. Pick up three stitches over the gap and knit until just below the length of the thumb. K1, k2tog around. K plain. K2 tog around and pull yarn through and fasten of

A blue hoodie for the biggest little

The biggest kiddo asked for a blue hoodie with a zipper and pockets as his next sweater, and so I obliged.  And of course finished just in time for the warm weather. Sigh. At least I made it big for him, cause that kid is due for a growth spurt any time now, and when it happens, he's going to be gigantic

Blocked, dried and ready for the zipper! Just in time for summer.

By the way, this picture is horrible in terms of color accuracy, even with me futzing with filters. The sleeve cap and last few pocket pictures are closer to reality. 

I'd picked up the yarn at Rhinebeck, Carolina Homespun Cormo wool, in Morgaine, a gorgeous bright cerulean blue.  The yarn was a bit fine, so I used it held double and it was a damn good thing I overbought based on my half assed guess of yardage, as I had literally TWO YARDS of yarn left after the final kitchnering of the hood.  Just made it.

That is all the yarn that is left from the entire thing. Two yards. A narrow miss of disaster!

After searching some through ravelry favorites, and general patterns, I settled on Doverfell, by Kristen Rengren, as published in Twist Collective.  I love the texture pattern and the design of the set in pockets, plus it was already written for a zip.

Of course, that didn't mean I wasn't going to tweak the shit out of the pattern. Because I am crazy and why follow patterns when you can rework them to suit your quirks? I mean, I almost always use a tubular cast on for anything with ribbing because it's firm but stretchy and looks fantastic.

Oh, look. Lint. And a long tail/Italian tubular cast on. 

But also, for example, the pockets.  As written, the pattern called for knitting the pocket lining separate from the body, and then working the body and pocket fronts in one, and then joining the two at the top edge of the pocket, sewing the three pocket seams later in finishing. 

I don't love seams in the body of knitting, as they never stretch the way the rest of the garment does. And they're a pain to do.  So instead, I knit the linings along with the body of the cardigan.

Before picking up pocket stitches. 

Then when I reached where the top of the pockets would join, I used double pointed needles to pick up the pocket front stitches along the top of the ribbing.  Then I picked up one stitch per row, vertically, on either side of the pocket edges (where the pocket "seams" would be).  I knit up the pocket front, in the texture pattern, knitting the first and last stitches of each row together with the picked up vertical "seam" stitches at each edge.  

The stitch markers on the verticals are to mark where the top of the pocket will be (and the start of the pocket shaping).

Pocket in progress.  Note the two layers. 

The harder part was figuring out the reworked decreases to do the shaping of the upper edge of the pockets.  I wound up just drawing it out, in a semi-shorthand, just so I could work out the numbers and the angle and lean of the decreases. 

Janky shorthand diagram, the original.

Janky shorthand diagram, the original.

 I moved the decreases in from the edge to give a cleaner line to the shaping, and I'd already decided to slip the first stitch of every row to give the nice chained edge (on both the pocket and the front edges)

Almost there.  Stay on target . . . stay on target . . . 

Then, I worked the pocket front stitches together with the body stitches, and the pockets were completely done.  

Finished pocket! Smooth sailing from here on out.  

I finished up the body of the sweater, shifting the armhole shaping in a few stitches as well to echo the shaping lines of the pockets and give a more full fashioned look. And instead of binding off stitches for the shoulders, which frankly, I never do, I used the German short row technique--which is AMAZING and INVISIBLE and I LOVE IT SO  MUCH.  That way I could also three-needle-bind-off the shoulder seams instead of seaming.

Once the body was complete, I reworked the sleeves from bottom-up in the round then sleeve cap worked flat and seamed in, to totally seamless top down sleeves with short row sleeve cap.

This is one of my favorite techniques, though I inevitably have to write out more diagrams to make sure I'm centering the cap right.  I first learned it, as many did, through Barbara Walker's Knitting from the Top.  (Did you know that not only is Barbara Walker a knitting guru, from the top down and the stitch dictionaries, but she also wrote the Little House on the Prairie Cookbook and a number of books on feminism, mythology and anthropology? God I fucking love her.)

I put the held underarm stitches on the needles, markers on either side for clarity, and then picked up stitches about 1 stitch every other row (not quite the 3 st to 4 row ideal ratio but it worked fine to make the numbers work),  around the armhole.  I divided the total number of stitches into thirds, with the beginning of the round at the center of the underarm stitches.

Oh hey, if you look hard enough, you could probably recreate my to-do list that's written on the back of this image.

I put markers in, because ain't no way I could keep the count right in my head as I began.  Beginning at the center of the underarm stitches, I worked up the first third of the front vertical stitches, and over the second third of the top of the cap.  Then I stopped, turned the work (again using the german short row method instead of the standard wrap and turn), worked back over that top third, PLUS ONE STITCH.  Wrap and turn, work across the top third PLUS ONE STITCH.

No to dos behind this one! Just shittily framed.

 I kept continuing along, eating up one additional stitch from the verticals every time, until I'd worked all of the verticals up and was at the underarm stitches.  Then I worked around the whole armhole as usual, working the short rowed stitches as per the german method. Voila, sleeve cap done!

Look at that perfect sleep cap! No tell tale anything of short rows! Damn it feels good to be a gangster!

Then I worked the sleeve from the top down, decreases instead of increases, ribbing, and tubular bind off to match the tubular cast on I'd done. Sleeves, done!

The hood was mainly the same as written.  Though I did add a bit more shaping to the center back line of the hood--4 more paired increases after those called for in the pattern.  A bit before wrapping up the hood, I decreased those back down again.  Then instead of three-needle-bind off for the hood itself, I kitchnered that shit. 

Now, that's some grafting of seed stitch right there!

 After all that work I wanted a nice seamless look to the hood, even it meant fudging the hell out of grafted seed stitch (figured out in part thanks to the Tricksy Knitter's tutorial).  

Thankfully texture hides most sins.  And still, a damn sight better than a visible ridge.

Now, I'm just waiting for the two zippers I ordered from ZipperSource--one red, one blue. We'll see which one looks best.  I'm debating using ribbon to cover the back of the zipper.  I think it'll look more finished and add some stabilization, but it also might be more of a pain in the ass than it's worth.  We shall see. 

8-bit / Minecraft old school knitting

I am old, and therefore remember when 8-bit graphics were all you got, man.  But these kids today, and their 3-d fancy rendered video games don't know how good they have it!  Hey you kids, get offa my lawn!

Anyway, a few folks I know are interested in making all the cool hipster 8-bit, or Minecraft, graphic knitted things, like say, a hat.  To which I say, I can help with that! (After they told me to write this. So ok. I do as I am told, sometimes)

Knitted color work is not that difficult, it's a trick, like anything knitting.  Once you do it, and puzzle it out, it's easier than you think.

Especially 8 bit graphics and Minecraft emblems, which are already pixelized and therefore DEAD EASY to transfer to a knitting colorwork chart. (I know, all those words may sound scary but THEY ARE NOT, TRUST.) I am going to assume that you already know how to knit, and can knit in the round, because while I can teach someone how to knit in person, online is a whole other ball of wax. 

Colorwork knitting is also called stranded knitting (because you are knitting with two strands of yarn, different colors), or fair isle knitting. In stranded knitting, you are using two colors of yarn per row, and are knitting some stitches in one color, some in the other color.  (There's also intarsia, which is a whole other thing--think the images in ugly Christmas sweaters and big blocks of color.) 

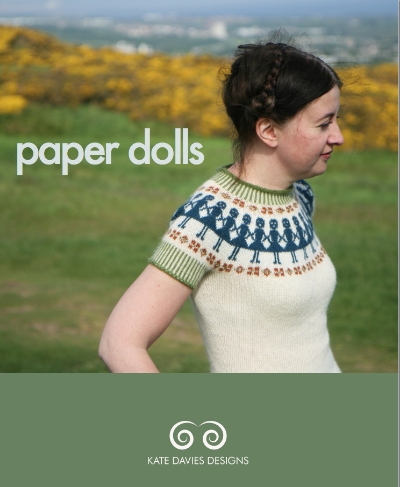
This is not an ugly Christmas sweater. This is Paper Dolls sweater pattern (c) Kate Davies

This is not an ugly Christmas sweater. This is Paper Dolls sweater pattern (c) Kate Davies

You can make all sorts of amazing, complicated-looking color patterns and pretty things with this technique. Kate Davies is a master of this--this is her Paper Dolls sweater, (ravelry link) is it not GORGEOUS? Go click through and look at her other stuff. Go buy her patterns. Support knitwear designers!

So there are a few rules to stranded knitwork, which will make your life easier.   When you're knitting a stitch in Color A, you carry along Color B behind; and vice versa.  Best practices is to keep the strands behind pretty loose so you don't lose the elasticity of the knitting, and to also not have more that 5 stitches of one color at a pop (so your strands, or floats, aren't too long and easily caught on things like hands, and ears, and glasses).

It's easier to understand when you see it (this is not me--this is the wonderful youtube channel, knittinghelp):

Now, the 8-bit stuff! Go find, or go draw, an 8-bit image you like.  Or pixelate a regular image to make it 8-bit-y.  Got it? Ok good. Now you're going to take that image and make it into a knitting chart.  I'd suggest starting with a one-color image, since you're really going to want to only work 2 colors per row of knitting.  Plus it'll look cool and graphic and stuff. 

You can make a pretty simple knitting chart for colorwork in Excel, if you're tech inclined.  Or on graph paper, if you're not or just want to play with colored pencils or markers. Hell, you can even go download knitters graph paper, which mimics the proportions of the knit stitch (slightly taller than it is wide) so your image doesn't come out wider and shorter than anticipated as it may using regular square graph paper.

Take your graph paper, take your image, and transfer the image to the graph paper, square by square.  If you're working on paper, this is actually pretty easy--put the graph paper over the image, and unless you're using fancy thick paper you should be able to see the ghost of the image on the graph paper.  Color it in.  Voila! You now have a chart!

Remember how I said you generally don't want more than 5 stitches between color changes? Look at your charted image and count the squares.  If there's more than 5 stitches in a color span, add a dot of the contrasting/background color.  (like so: XXXXXoXXXXX) I promise it won't look too weird.  

Ok, so now you have your charted, tweaked, image.  You can knit it! Knitting from charts is straightforward. Each box is a stitch. If the stitch is colored in, knit it with your image color.  If it's not colored in, knit it with your background color.  You'll be working from the bottom of the chart up, and reading/knitting the chart from right to left, bottom to top. Each row of the chart is a row of knitting. If you're knitting in the round--and for reals, you should be, it's easiest to go circular for stranded knitting--this means each row is a round, and you will ALWAYS be starting at the right hand side of the chart and working to the left. 

Depending on your gauge/the size yarn you're using, you can repeat the image around the circumference of the hat, like say, a line of space invader dudes around the brim of a beanie. To do this, take your chart, and  make sure you have a few stitches/columns on either side of the motif in the background color. Now, count the stitches in the chart, including these columns, this will be your repeat.  

Let's say you're doing a hat with a 10 stitch motif, and you want two stitches between each motif--your repeat is 12 stitches.  Cast on a circular needle enough stitches for a hat: MAKE SURE THE NUMBER OF STITCHES ON YOUR NEEDLE IS A MULTIPLE OF YOUR REPEAT. (in this case, 60 st, or 120 st, or whatever works with the size yarn/size head). No one wants a space invader cut in half.  Use a stitch marker to mark the beginning of your round. Work a few rounds in the background color, either in a non-curling pattern (like rib) or for an inch or so in stockinette (for a rolled brim)

When you hit where you want the image, begin your chart. As you knit, you'll knit the first row of your motif as per the chart, and then the two stitches in the background color, then knit the first row of your motif again. And the two stitches of the background color, again.  Repeat all the way around.  Then do the second row of your chart, and repeat it all the way around.  Then the third row....etc. when you've completed the full chart of the motif, break the motif yarn, leaving a tail, and finish up your hat with the background color. 

(How to finish a hat you ask? Knit until it's as tall as you want, then decreasing for the crown at even points. Divide your stitch count by 6 or 8, and mark these points using stitch markers. K2together at those points every other round until you have half as many stitches as you started with. Then k2tog at these points every round until you have either 6 or 8 stitches--depending on how many points you picked--break yarn and pull the yarn through those stitches left, pull tight. Weave in ends, boom you have a hat.)

So, let's say you're working in super bulky yarn and only want one image on your hat.  

  1. I hope you like weaving in ends.  
  2. Consider two images? One front, one back?
  3. No? How about a dotted hat, alternating the two colors around the hat, except where the motif is (aka:  knit the motif, then knit 2 stitches background, 2 stitches motif color, around until you get back to the motif)?
  4. Still no? Welp, get ready to weave in ends. 

Ok then. Follow the same instructions, only decide where you want your motif.  When you're ready to start the image, begin knitting your chart the same way. Knit the first row of your chart once, drop the motif yarn, cut leaving a tail. Knit in the background color til you get back to the motif. Add in motif yarn, leaving a tail, knit the second row of the chart, drop the yarn leaving a tail. Repeat.  

Finish up the hat and weave in the copious amount of ends and regret your choices in life.  (I kid! I kid!)