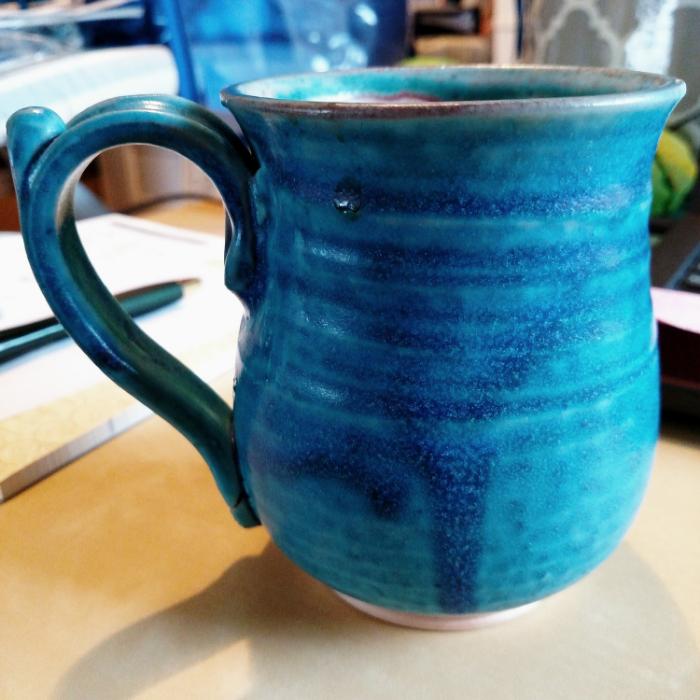
I love this mug.

did you notice I cropped out the unholy mess behind the mug? Mostly, I mean. 

did you notice I cropped out the unholy mess behind the mug? Mostly, I mean. 

It's not one of mine, but it's one I'm striving towards creating in terms of design.  It's from Scargo Pottery, a fantastic place on Cape Cod in Brewster, MA.  They have several amazing potters creating there, and we go to visit it every year. (last summer we saw a raku firing there. SO COOL.)  And every year, we come home with more mugs.  All of which are lovely, but there are some I love more than others.  Like this one.

It also holds a shitton of coffee, bless. 

Scargo Pottery 30 Dr. Lords Road, S, Dennis, MA 02638.  And they're open year round, not just seasonally.


tactile necklaces

So teething necklaces are a THING these days. A very useful thing, if you ask me, as my littlest little liked to yank the shit out of my everyday necklace (silver chain with the biggest little's thumbprint on it, made by Camille Cesari, who I cannot recommend highly enough for parent/grandparent gifts!).

Oh, ignore the laundry behind me in the bathroom, and the fact that this was the first time in days I was vertical (stupid stomach bug) and focus instead on my accidental coordination of phone case and neckl;ace! I'm a grown up lady who does that th…

Oh, ignore the laundry behind me in the bathroom, and the fact that this was the first time in days I was vertical (stupid stomach bug) and focus instead on my accidental coordination of phone case and neckl;ace! I'm a grown up lady who does that thing not at all by accident!

They're essentially necklaces for grownups--not for kids--that are made from silicone beads, strung on satin cord with a breakaway clasp (pull hard on the clasp and it'll break apart so no one strangles on it).  Really, they should be knotted necklaces, with knots between each bead to keep it from being a choking hazard, but some of the cheaper ones out there are not handknotted--a bad idea for anything designed for kids.

The silicone beads are firm, but slightly squishy and have a great tactile matte rubbery feeling.  As you wear them they warm up and soften slightly.  And as someone who really likes tactlie things,  it's really really hard to keep myself from gnawing on them. So I squish them instead. 

They're pretty cute, very "statement necklace"-y. And the folks who make them charge a lot for them (rightfully--time + materials + profit = $

But I like making shit. And I like choosing my own color and bead combos. And not paying $60 for something I can make myself.  

So, I hit etsy for some silicone beads, and got a couple of different colors and bead shapes, as well as the breakaway clasps. I had the satin cord already.  An hour on the couch in front of the teevee, and bam, several new colorful necklaces that I can fiddle when bored or let my kid chomp on while I'm holding him!

Do you think the filter covers up the cat hair on the duvet? I hope so. 

Do you think the filter covers up the cat hair on the duvet? I hope so. 

8-bit / Minecraft old school knitting

I am old, and therefore remember when 8-bit graphics were all you got, man.  But these kids today, and their 3-d fancy rendered video games don't know how good they have it!  Hey you kids, get offa my lawn!

Anyway, a few folks I know are interested in making all the cool hipster 8-bit, or Minecraft, graphic knitted things, like say, a hat.  To which I say, I can help with that! (After they told me to write this. So ok. I do as I am told, sometimes)

Knitted color work is not that difficult, it's a trick, like anything knitting.  Once you do it, and puzzle it out, it's easier than you think.

Especially 8 bit graphics and Minecraft emblems, which are already pixelized and therefore DEAD EASY to transfer to a knitting colorwork chart. (I know, all those words may sound scary but THEY ARE NOT, TRUST.) I am going to assume that you already know how to knit, and can knit in the round, because while I can teach someone how to knit in person, online is a whole other ball of wax. 

Colorwork knitting is also called stranded knitting (because you are knitting with two strands of yarn, different colors), or fair isle knitting. In stranded knitting, you are using two colors of yarn per row, and are knitting some stitches in one color, some in the other color.  (There's also intarsia, which is a whole other thing--think the images in ugly Christmas sweaters and big blocks of color.) 

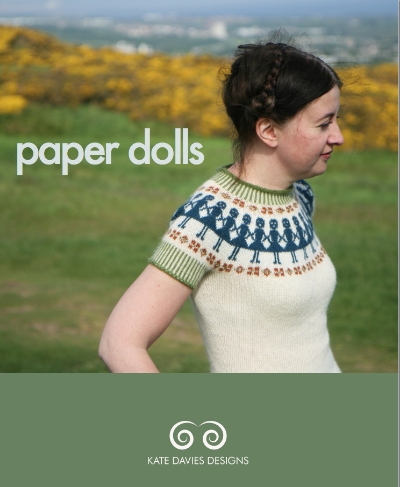
This is not an ugly Christmas sweater. This is Paper Dolls sweater pattern (c) Kate Davies

This is not an ugly Christmas sweater. This is Paper Dolls sweater pattern (c) Kate Davies

You can make all sorts of amazing, complicated-looking color patterns and pretty things with this technique. Kate Davies is a master of this--this is her Paper Dolls sweater, (ravelry link) is it not GORGEOUS? Go click through and look at her other stuff. Go buy her patterns. Support knitwear designers!

So there are a few rules to stranded knitwork, which will make your life easier.   When you're knitting a stitch in Color A, you carry along Color B behind; and vice versa.  Best practices is to keep the strands behind pretty loose so you don't lose the elasticity of the knitting, and to also not have more that 5 stitches of one color at a pop (so your strands, or floats, aren't too long and easily caught on things like hands, and ears, and glasses).

It's easier to understand when you see it (this is not me--this is the wonderful youtube channel, knittinghelp):

Now, the 8-bit stuff! Go find, or go draw, an 8-bit image you like.  Or pixelate a regular image to make it 8-bit-y.  Got it? Ok good. Now you're going to take that image and make it into a knitting chart.  I'd suggest starting with a one-color image, since you're really going to want to only work 2 colors per row of knitting.  Plus it'll look cool and graphic and stuff. 

You can make a pretty simple knitting chart for colorwork in Excel, if you're tech inclined.  Or on graph paper, if you're not or just want to play with colored pencils or markers. Hell, you can even go download knitters graph paper, which mimics the proportions of the knit stitch (slightly taller than it is wide) so your image doesn't come out wider and shorter than anticipated as it may using regular square graph paper.

Take your graph paper, take your image, and transfer the image to the graph paper, square by square.  If you're working on paper, this is actually pretty easy--put the graph paper over the image, and unless you're using fancy thick paper you should be able to see the ghost of the image on the graph paper.  Color it in.  Voila! You now have a chart!

Remember how I said you generally don't want more than 5 stitches between color changes? Look at your charted image and count the squares.  If there's more than 5 stitches in a color span, add a dot of the contrasting/background color.  (like so: XXXXXoXXXXX) I promise it won't look too weird.  

Ok, so now you have your charted, tweaked, image.  You can knit it! Knitting from charts is straightforward. Each box is a stitch. If the stitch is colored in, knit it with your image color.  If it's not colored in, knit it with your background color.  You'll be working from the bottom of the chart up, and reading/knitting the chart from right to left, bottom to top. Each row of the chart is a row of knitting. If you're knitting in the round--and for reals, you should be, it's easiest to go circular for stranded knitting--this means each row is a round, and you will ALWAYS be starting at the right hand side of the chart and working to the left. 

Depending on your gauge/the size yarn you're using, you can repeat the image around the circumference of the hat, like say, a line of space invader dudes around the brim of a beanie. To do this, take your chart, and  make sure you have a few stitches/columns on either side of the motif in the background color. Now, count the stitches in the chart, including these columns, this will be your repeat.  

Let's say you're doing a hat with a 10 stitch motif, and you want two stitches between each motif--your repeat is 12 stitches.  Cast on a circular needle enough stitches for a hat: MAKE SURE THE NUMBER OF STITCHES ON YOUR NEEDLE IS A MULTIPLE OF YOUR REPEAT. (in this case, 60 st, or 120 st, or whatever works with the size yarn/size head). No one wants a space invader cut in half.  Use a stitch marker to mark the beginning of your round. Work a few rounds in the background color, either in a non-curling pattern (like rib) or for an inch or so in stockinette (for a rolled brim)

When you hit where you want the image, begin your chart. As you knit, you'll knit the first row of your motif as per the chart, and then the two stitches in the background color, then knit the first row of your motif again. And the two stitches of the background color, again.  Repeat all the way around.  Then do the second row of your chart, and repeat it all the way around.  Then the third row....etc. when you've completed the full chart of the motif, break the motif yarn, leaving a tail, and finish up your hat with the background color. 

(How to finish a hat you ask? Knit until it's as tall as you want, then decreasing for the crown at even points. Divide your stitch count by 6 or 8, and mark these points using stitch markers. K2together at those points every other round until you have half as many stitches as you started with. Then k2tog at these points every round until you have either 6 or 8 stitches--depending on how many points you picked--break yarn and pull the yarn through those stitches left, pull tight. Weave in ends, boom you have a hat.)

So, let's say you're working in super bulky yarn and only want one image on your hat.  

  1. I hope you like weaving in ends.  
  2. Consider two images? One front, one back?
  3. No? How about a dotted hat, alternating the two colors around the hat, except where the motif is (aka:  knit the motif, then knit 2 stitches background, 2 stitches motif color, around until you get back to the motif)?
  4. Still no? Welp, get ready to weave in ends. 

Ok then. Follow the same instructions, only decide where you want your motif.  When you're ready to start the image, begin knitting your chart the same way. Knit the first row of your chart once, drop the motif yarn, cut leaving a tail. Knit in the background color til you get back to the motif. Add in motif yarn, leaving a tail, knit the second row of the chart, drop the yarn leaving a tail. Repeat.  

Finish up the hat and weave in the copious amount of ends and regret your choices in life.  (I kid! I kid!)
look I made a hat!

Not a hat. Almost a muppet.

Not a hat. Almost a muppet.

Well, almost a hat.  And in fact, probably not going to wind up a hat, maybe socks? Or a shawl?  I don't know yet.

JBB suggested doing a stuffed muppety dinosaur with it, because muppet colors.  But I'm not sure a fingering weight handspun would work, plus I'm wary of how the gradient would work up on a figure.  I'll think about it anyway.

This is the December 14 Spunky Eclectic club fiber (4oz, BFL superwash), spun on a spindle and then chain plied on the same spindle to keep the color gradient. It goes from Big Bird to Zoe to Elmo to Tully to Rosita to Grover. 

I figured out chain plying! Which is apparently more advanced than I'd anticipated! But also pretty straightforward when you figure it out.  I pulled long loops of the single through loops, essentially making a big ole loose crochet chain, and wound that into a plying ball. then I added twist with the spindle from the plying ball.  If none of these words make sense to you, here's a tutorial on chain plying from Craftsy. It has pictures that might help. 

I was expecting this to come out more as a light worsted weight yarn, since this is a chain ply--so a three ply--but I guess my singles were way lighter than I'd realized.  Which actually makes me very glad that I did not do my original plan of spinning the other 4oz I have and making a 2-ply yarn.  

Speaking of that other 4oz . . . I am thinking that I'll split it in half, and try to spin that to about a worsted weight two-ply, then maybe make mitts or a hat? Suggestions anyone?

photo prints

My grandmother, my mom's mom, asked for photos of her kids for Christmas (or birthday--honestly, I have no idea which) presents. And so my mom enlisted me and JBB to take pictures of her when we were on vacation between Christmas and New Years

It went well! I now have fifty zillion pictures of my mom making weird faces on my phone, and about ten really good pictures of her.  Normally, I would have just used instagram to futz with the photo, but mom and Oma wanted an honest to god 5x7 normal picture and not one of our fancypants newfangled square format ones. 

DIGRESSION: Where the hell are all the square format picture frames? SERIOUSLY PEOPLE.  I will give you money for decent 4x4 picture frames. 

And because I am lazy and do everything on my phone (and have no idea how to actually use photoshop), I also futzed with it using my favorite non-instagram photo futzing app, pixlr

DIGRESSION 2: It's a little terrifying to me, the olds, that I don't use a digital camera anymore, I just use my phone.  And that my phone has a far far better camera than any camera I've owned, ever.

So back to the problem: now we need to get an actual print of it. And my go-to place for instagram prints, Print Studio (formerly Prinstagram), doesn't do normal proportion prints.  But I love their super thick card stock paper, matte finish, so I'm looking for other places to print pics that have that and are not Shutterfly or Snapfish.

Anyone got any suggestions?

I'm going to wind up with a million spindles, aren't I....

drafting

Honestly, I blame my cousin.

We went to Rhinebeck in October--my first time there!--and she was all, oh, do you want to learn to spin? Super casually, of course. DESPITE KNOWING IT WAS LIKE CRACK. 

One spindle and two bumps of hand dyed blue faced leicester later, she showed me how to begin with a leader, give the spindle a good solid twirl and then park it between my knees and draft out the fiber.  Addicted.


firsthandspun

My very first handspun, wildly uneven but pretty! It took me a while to decide what to make out of it.  A while and 4 oz of green BFL top, a membership in the Spunky Eclectic fiber club, and a stack of hand dyed silk hankies later.... 


And now, I'm spending lunch looking at Golding ring spindles, rim weighted with brass and metals and with amazing carvings on the whorls.  Would you LOOK at these amazing things? Who wouldn't want one?

Yeah, I'm going to wind up with at least one.  Any bets on how long before I get a wheel?